FRED AND ROBBIN
  • Home Page
  • Travel Stories
    • Heading south 2018
    • Exploring the Apache Trail
    • Tonto Cliff Dwellings
    • 4 Wheeling 4 Peaks
    • Bouncing through Box Canyon
    • Montana Mountain
    • Jerome
  • Arizona Stories
    • Life in Arizona
    • Woodturning Guide
    • Southwest 2017
    • What it's like at Gold Canyon
  • Boating in the Northwest
    • Broughtons 2017
  • The Neighborly Lane Story

in the woodshop

Watch and learn

1/16/2023


Learn from the best

Go to YouTube and search "woodturning." You'll get more results than the wood shavings from a 12" bowl. Generally as a cure for insomnia, I keep finding good stuff all the time. Here's a selection of my current favorites:
  • Turn your first bowl  This is a good place to start.
  • Turn A Wood Bowl ​ This comprehensive set of videos will keep you entertained for hours. Note: This teacher uses bowl gouges pretty much exclusively. Even if you don't use one, there's a lot to learn here. Mikie learned bowl gouge skills from this site.
  • Ashley Harwood Slick, zen, and a feminine approach with lots of good information. Lots of advertising too, so be ready. 
  • Lisa Ramlow Like Ashley Harwood, Lisa is a woman who starts her projects with a chainsaw. From there, the two couldn't be more different. Lisa's videos aren't slick but they're very informative.  Unlike many turners, she uses gouges, scrapers, and carbides on the same project. She's the first turner I've seen use pneumatic tools.
  • Mike Walt Woodturning Comprehensive site with many examples of bowl turning as well as a good introduction to other lathe projects.
  • Mike Peace Woodturning Not a lot of bowl turning, but this site digs into a huge array of lathe projects, from chess sets to Christmas ornaments. He also offers tips and tricks for wood turning, tools, and tool maintenance. 
​

Turning your first bowl

1/15/2023


Step-by-step guide

Turning a bowl involves a number of steps. To stay on track, you might want to use this list as a cheat sheet. (Note: We're starting with your wood blank already on a chuck, which we'll cover in a future lesson.)
  1. Put on your safety gear: A face shield is mandatory. Use a dust mask and ear protection as needed.
  2. Put the wood blank on the lathe by screwing the chuck on to the headstock spindle.
  3. Select the scraper you'll use to start turning the bowl (your instructor will help with this).
  4. Set the tool rest so that when the tool is flat on the rest it is pointed directly at the center of the bowl. (Otherwise it's going to either grab on the bowl or fly off of it. You don't want that.)
  5. Before turning on the lathe, revolve the wood by hand first to make sure the rest is close to the bowl without touching the wood.
  6. Turn on the lathe. Talk to your instructor about the best speed to use for the project you're making.
  7. To avoid having the tool catch on the wood, always keep it flat on the rest. 
  8. Turn the outside of the bowl into the shape you want. Some people sand and finish the outside at this stage.
  9. Turn the inside of the bowl. Match the inside shape to the outside shape without getting the wood too thin or going through the bottom of the bowl. They say "we all do it" and that's true. But we'll start out making sure you don't. You can use the shop's calipers to test the thickness of your bowl sides. There are other techniques for gauging the thickness of the bowl's bottom. They vary depending on the chuck you're using, your instructor will help you keep an eye on the bottom thickness as you go.
  10. While its still on the lathe, sand the bowl till it's smooth enough to make you happy. The pros get pretty fussy about creating a mirror finish. You can if you want, but we won't judge if you think that's overkill.
  11. If you're using a wooden chuck glued to the bottom of your bowl, cut it off with the parting tool. Otherwise, take the bowl out of the metal chuck.
  12. Finish the bottom of the bowl by hand sanding. Or, you can put the bowl back on the lathe using Cole Jaws to hold the bowl by its top so you can sand the bottom.
  13. Finish the bowl with oil, clear spray, wax, or other treatment. 
  14. Grab the bowl, run home, and show your friends and family how talented you are!!!

The tools you'll use

1/12/2023


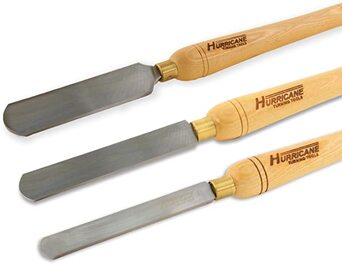
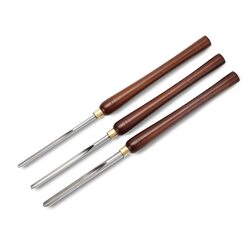
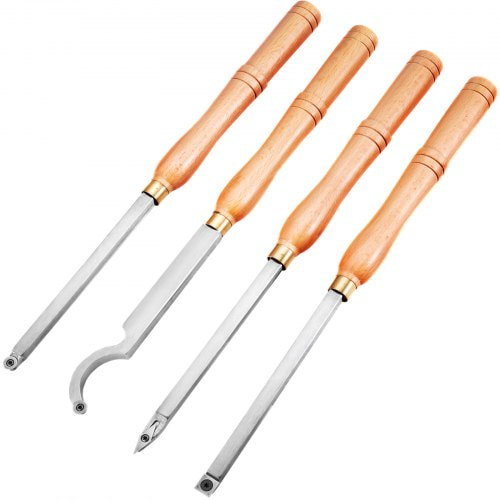
What you'll use: lathe, chuck, and cutting tools

When you make a bowl, you're using a lathe to spin a piece of wood attached to the lathe by a chuck while using cutting tools to shape the bowl. This process is referred to as "turning a bowl." And you are about to become a "wood turner."

1. Lathe spins the wood for cutting

This diagram covers the key components of a wood lathe. This introductory video shows how the lathe works.
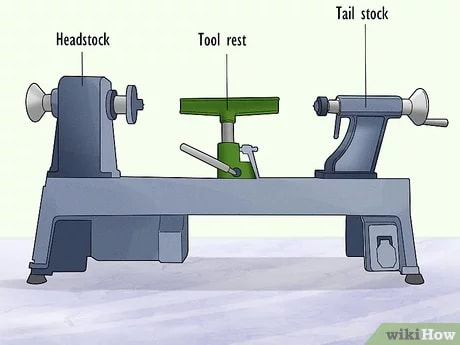
Picture

2. Chuck attaches the bowl to the lathe

The chuck holds your wood on the lathe's headstock while you're turning the bowl.  Most beginners start with a wooden chuck, as shown in the first photo below. If you start making a lot of bowls, you'll find it helpful to have a metal chuck you can use over and over. 
Picture
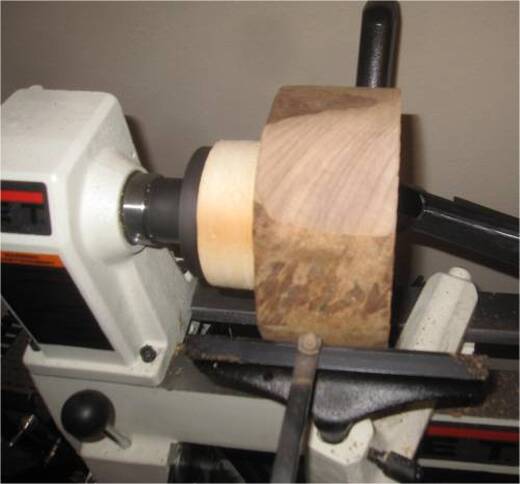
Dummy chuck: The bowl is glued to a piece of scrap wood that's connected to the lathe with a faceplate.
Picture
Woodturning lathe chuck: Holds the wood with four adjustable jaw and screws onto the headstock.

3. Cutting tools shape the bowl

There are three major categories of cutting tools: scrapers, bowl gouges, and carbide-tipped cutters, each with pros and cons. In our class, we use scrapers supplied by the shop.
Picture
Scrapers
Picture
Bowl gouges
Picture
Carbide tipped cutters
This video digs into the differences between the three types of tools and the pros and cons of each. 

Finding the right wood

1/11/2023


Three places to get wood

Thanks to a generous gift from a prior Gold Canyon resident, we can supply the wood you need to make your first bowl. If you continue with this hobby, you'll need to get your own wood. You'll have three options:

1. Milled construction lumber, such as pine from Home Depot. You won't see this used as much in our woodshop, but it's a terrific way to get started, in fact, that's what the instructor uses in the Turn your first bowl video. And this video gives tips on using this inexpensive option.

2. Milled lumber from specialty stores: This is generally hardwood such as maple and walnut, as well as more exotic woods such as padauk and zebra wood. 

3. Logs from a variety of sources, such as tree maintenance companies. In Arizona, it's not too hard to find local woods such as mesquite. Unlike lumber, this raw wood needs to be dried for about a year (it varies by size and type of wood) before you'll want to make a bowl with it. Wet wood, also called green wood, can be used, but your bowl will change shape and possibly crack as it dries.

Your most important skill isn't turning. It's turning safely.

1/6/2023


Safety essentials

The least you need to know: 
  1. MANDATORY: Wear a face shield or at minimum, safety glasses.
  2. Wear a dust mask as needed
  3. Wear ear protection as needed
  4. NEVER reach across a machine that's running.  Why? Well, once I got my arm stuck in a conveyor belt and another time I got too close to the table saw blade. 
  5. If you must wear gloves, cut off the fingertips. The lathe can grab the glove and remove your finger.
  6. Understand how your tools work
          * How to put your bowl on the lathe
          * How to turn the lathe on and off
          * 
How to choose the right speed for the lathe to turn
          * 
How to use the tool rest
          * How to safely use each cutting tool (gouge, scraper, and parting tool)

That's the short list. Here's a long one from the Canadian Centre for Occupational Safety. 
  • Wear safety glasses with side shields or safety goggles, or a face shield (with safety glasses or goggles) to protect yourself from flying chips.
  • Wear hearing protection that is suitable for the level and frequency of the noise you are exposed to in the woodworking area.
  • Wear respiratory protection when dust is generated (e.g., during sanding operations).
  • Wear protective footwear when required.
  • Work in well-lighted area.
  • Before the lathe is turned on, make sure that all clamps and fittings are secure and that the work piece is free to turn.
  • Use stock that is free of defects, such as loose knots, splits, cracks, or foreign objects.
  • Hold tools firmly with both hands and against the tool rest.
  • Hold the stock securely on the faceplate or between the centres.
  • Use only furnished or approved tools that are meant for lathe work.
  • Use sharp, well-maintained chisels and gouges.
  • Select a speed that is appropriate for the job. Operate at speeds recommended by the manufacturer. Select a low speed and use a moderate cut depth to prevent splinters from flying out during roughing operations. The actual speed of the lathe depends on type of wood, a diameter of stock, nature of work being done and type of tool used.
  • Adjust tool rests so that they are parallel and as close as possible to the stock. They should also be set high enough so that tools will cut into the wood slightly above the centre of the work being turned.
  • Remove the tool rest when sanding or polishing.
  • Use appropriate tools to hold the sand paper or emery paper whenever possible. Examples include a 'nut cracker' or the paper fixed to a piece of flat wood. If you must use your hands always hold the paper in a way that will not allow the paper to catch, pull or entangle around the stock.
  • To make a faceplate turning, the one hand steadies the tip of the chisel, which holds the edge against the tool rest while the other hand guides the tool. Keep the tip of the chisel held higher than the handle.​​

    Archives

    January 2023

  • Home Page
  • Travel Stories
    • Heading south 2018
    • Exploring the Apache Trail
    • Tonto Cliff Dwellings
    • 4 Wheeling 4 Peaks
    • Bouncing through Box Canyon
    • Montana Mountain
    • Jerome
  • Arizona Stories
    • Life in Arizona
    • Woodturning Guide
    • Southwest 2017
    • What it's like at Gold Canyon
  • Boating in the Northwest
    • Broughtons 2017
  • The Neighborly Lane Story